This web site is not a blog, even though it's a collection of random pieces of text on different subjects. However, I prefer more structure to the pages than the continuous flow common to the blog.
Over the years, I have been using Synology NASes. They provide a neatly packaged system, where (nowadays) virtualisation is included. This reduces the number of boxes required in the home lab set up. However, I have opted out of the included "Synology Directory Manager" as user directory. Mostly to avoid the lock-in-effect, and that I prefer to store my user accounts in a system where it can be replicated to nodes running elsewhere, not requiring a Synology branded system.
FreeIPA provides an easy to manage Identity management system, including directory (LDAP) services, which (nowadays) is rather robust with working multimaster replication between instances. It has also proven to work well as LDAP backend for my Synology systems and also to fit well as LDAP backend to a Postfix/Dovecot based mail system. This setup reduces the system to a single management interface.
I will not cover the general setup of FreeIPA including replication in this article. That has been covered in length at many sites, including the official documentation. A working FreeIPA instance is, quite obviously, a prerequisite for using it with a Synology NAS.
Synology requirements on LDAP
Synology provides a directory service package, based on OpenLDAP. Although it is a lean solution in many cases, I personally prefer keeping users in separate system. Furthermore, the file sharing services in Synology DSM are based on Samba. DSM can authenticate users towards the internal user database, an LDAP directory (like the Synology branded directory service package) or be bound to Active Directory. Binding DSM to an LDAP directory implies certain requirements on the schema used. This is where the effort has to be put in order to use FreeIPA as LDAP directory for Synology. Basically, all attributes of a user entry required by DSM/Samba are available in FreeIPA, but the attribute names are different due to differences in schema usage. (Synology uses the OpenLDAP Samba schema, or something akin to that). Thus, just binding the DSM to a FreeIPA will fail with rather long list of complaints for lacking attributes. Importantly, Synology requires the NTHash, even though this is questionable from a security perspective. (On a side note, the NTHash might also required if you would like to use FreeIPA as backend for a radius server, depending on authentication protocol used.)
FreeIPA
The process of preparing FreeIPA to cater for the needs of a Synology system includes preparing the directory to include relevant data, such as the NTHash and SID numbers. We also need to make these data available to Synology in format that DSM can interpret.
Preparing authentication data
FreeIPA has support for cross-realm trust towards Active Directory. We do not need to use this, but preparing the FreeIPA directory for AD trust installs necessary schema. Hence, when it is installed, it will also populate the NTHash of users on password change as well as populate the SID numbers. AD trust is installed by running a single command:
$ sudo dnf install freeipa-server-trust-ad
$ sudo ipa-adtrust-install --add-sids
To my experience, this command will have to be run on all FreeIPA server instances. This script Once the required data is available in the directory, we need to make this available to FreeIPA.
Making account data available to DSM
There are basically two alternative approaches when binding Synology to FreeIPA. Either you configure the Synology DSM to fetch fields according to a mapping configuration that describes how attributes should be mapped from the directory servers native schema. However, this approach only support a very limited number of attributes, and not all attributes needed for a full featured bind. The other alternative would be if we could provide a view of the users and groups in the directory that looks like what Synology DSM expects. When browsing the directory tree of FreeIPA I noticed the cn=compat subtree, which provides a limited mirror of the main cn=accounts subtree. This subtree provided a hint about a feasible solution, as this is provided by the "Schema Compatibility" plugin to the 389 directory server, provided as part of the slapi-nis plugins.
Schema compatibility
The Schema Compatibility plugin is a little documented plugin to 389 directory server. This plugin can be used to create new view (with an adapted schema) of the directory content in a different subtree. There is some introductory help here and further help here. Based on this, and from dumping user accounts from a Synology Directory Server test-setup, I have created the following Schema Compatibility configuration entries. They will create a subtree at cn=syno,dc=ipa,dc=domain. First add structural entries (done with ldapadd):
dn: cn=syno,dc=ipa,dc=domain
objectClass: top
objectClass: extensibleObject
cn: syno


dn: cn=groups,cn=syno,dc=ipa,dc=domain
objectClass: top
objectClass: extensibleObject
cn: groups


dn: cn=users,cn=syno,dc=ipa,dc=domain
objectClass: top
objectClass: extensibleObject
cn: users
Please replace "dc=ipa,dc=domain" with what is appropriate for your config. Once the structural entries are there, we can add the user and group entries to the Schema Compatibly config space. The user entry will look like this:
dn: cn=syno_users,cn=Schema Compatibility,cn=plugins,cn=config
cn: syno_users
objectClass: top
objectClass: extensibleObject
schema-compat-container-group: cn=syno,dc=ipa,dc=domain
schema-compat-container-rdn: cn=users
schema-compat-entry-attribute: objectClass=top
schema-compat-entry-attribute: objectClass=posixAccount
schema-compat-entry-attribute: objectClass=shadowAccount
schema-compat-entry-attribute: objectClass=person
schema-compat-entry-attribute: objectClass=organizationalPerson
schema-compat-entry-attribute: objectClass=inetOrgPerson
schema-compat-entry-attribute: objectClass=sambaSamAccount
schema-compat-entry-attribute: objectClass=sambaIdmapEntry
schema-compat-entry-attribute: objectClass=extensibleObject
schema-compat-entry-attribute: cn=%{cn}
schema-compat-entry-attribute: uid=%{uid}
schema-compat-entry-attribute: uidNumber=%{uidNumber}
schema-compat-entry-attribute: gidNumber=%{gidNumber}
schema-compat-entry-attribute: loginShell=%{loginShell}
schema-compat-entry-attribute: homeDirectory=%{homeDirectory}
schema-compat-entry-attribute: shadowMin=0
schema-compat-entry-attribute: shadowMax=99999
schema-compat-entry-attribute: shadowWarning=7
schema-compat-entry-attribute: shadowExpire=-1
schema-compat-entry-attribute: shadowInactive=0
schema-compat-entry-attribute: shadowFlag=0
schema-compat-entry-attribute: sn=%{sn}
schema-compat-entry-attribute: authAuthority=;basic;
schema-compat-entry-attribute: apple-generateduid=%{ipaUniqueID}
schema-compat-entry-attribute: sambaSID=%{ipaNTSecurityIdentifier}
schema-compat-entry-attribute: sambaAcctFlags=[U          ]
schema-compat-entry-attribute: displayName=%{displayName}
schema-compat-entry-attribute: structuralObjectClass=inetOrgPerson
schema-compat-entry-attribute: entryUUID=%{ipaUniqueID}
schema-compat-entry-attribute: memberOf=%mregsubi("%{memberOf}","cn=([^,]*),cn=groups,cn=accounts,dc=ipa,dc=domain","cn=%1,cn=groups,cn=syno,dc=ipa,dc=domain")
schema-compat-entry-attribute: sambaNTPassword=%{sambaNTPassword}
schema-compat-entry-attribute: sambaLMPassword=XXXXXXXXXXXXXXXXXXXXXXXXXXXXXXXX
schema-compat-entry-attribute: sambaPwdLastSet=1457562876
schema-compat-entry-attribute: pwdChangedTime=20160309223436Z
schema-compat-entry-attribute: entryCSN=20160309223436.500969Z#000000#000#000000
schema-compat-entry-rdn: uid=%{uid}
schema-compat-ignore-subtree: cn=dna,cn=ipa,cn=etc,dc=ipa,dc=domain
schema-compat-restrict-subtree: cn=Schema Compatibility,cn=plugins,cn=config
schema-compat-restrict-subtree: dc=ipa,dc=domain
schema-compat-search-base: cn=users, cn=accounts, dc=ipa,dc=domain
schema-compat-search-filter: (&(objectclass=posixAccount)(objectclass=sambasamaccount))
Once again, replace "dc=ipa,dc=domain" which your domain component. Note that the attributes for password change are hardcoded to an arbitrary number sometime in the past. They are required, but ignored by SynologyDSM. In short, this entry projects the cn=users,cn=accounts subtree onto cn=users,cn=syno, while rewriting the entries to add/remove attributes and create a view that is good for Synology DSM. Same thing will be done with the groups view. dc=ipa,dc=domain should be replaced to fit your usage.
dn: cn=syno_groups,cn=Schema Compatibility,cn=plugins,cn=config
cn: syno_groups
objectClass: top
objectClass: extensibleObject
schema-compat-container-group: cn=syno,dc=ipa,dc=domain
schema-compat-container-rdn: cn=groups
schema-compat-entry-attribute: objectClass=top
schema-compat-entry-attribute: objectClass=posixGroup
schema-compat-entry-attribute: objectClass=extensibleObject
schema-compat-entry-attribute: objectClass=sambaGroupMapping
schema-compat-entry-attribute: objectClass=sambaIdmapEntry
schema-compat-entry-attribute: cn=%{cn}
schema-compat-entry-attribute: gidNumber=%{gidNumber}
schema-compat-entry-attribute: description=%{description}
schema-compat-entry-attribute: apple-generateduid=%{ipaUniqueID}
schema-compat-entry-attribute: sambaSID=%{ipaNTSecurityIdentifier}
schema-compat-entry-attribute: displayName=%{displayName}
schema-compat-entry-attribute: sambaGroupType=2
schema-compat-entry-attribute: structuralObjectClass=posixGroup
schema-compat-entry-attribute: entryUUID=%{ipaUniqueID}
schema-compat-entry-attribute: memberUid=%mregsubi("%{member}","uid=([^,]*),cn=users,cn=accounts,dc=ipa,dc=domain","%1")
schema-compat-entry-attribute: member=%mregsubi("%{member}","uid=([^,]*),cn=users,cn=accounts,dc=ipa,dc=domain","uid=%1,cn=users,cn=syno,dc=ipa,dc=domain")
schema-compat-entry-rdn: cn=%{cn}
schema-compat-ignore-subtree: cn=dna,cn=ipa,cn=etc,dc=ipa,dc=domain
schema-compat-restrict-subtree: cn=Schema Compatibility,cn=plugins,cn=config
schema-compat-restrict-subtree: dc=ipa,dc=domain
schema-compat-search-base: cn=groups, cn=accounts, dc=ipa,dc=domain
schema-compat-search-filter: (&(objectclass=posixGroup)(objectclass=ipantgroupattrs))
Access role for Synology DSM
Finally, we need to grant Synology DSM read access to relevant data. By default, neither normal users, nor service accounts can see eg the NTHash. William Brown has written a good blog post on allowing read-access to relevant attributes in FreeIPA. His approach is a command line procedure, which works well. For the more GUI inclined person, most steps can be accomplished in the FreeIPA management web interface.
FreeIPA applies a role based permission system. Briefly, we need to create a role for the services that will consume the account data. The role needs one or more privileges, which in turn contains specific permissions to the LDAP tree. The essence of the first step is to create a permission allowing read, search and compare permissions to the following attributes: cn, createtimestamp, description, displayName, entryUUID, entryusn, gidNumber, homeDirectory, loginShell, member, memberOf, memberUid, modifytimestamp, objectClass, sambaAcctFlags, sambaGroupType, sambaLMPassword, sambaNTPassword, sambaPwdLastSet, sambaSID, shadowExpire, shadowFlag, shadowInactive, shadowMax, shadowMin, shadowWarning, sn, structuralObjectClass, uid, uidNumber. Many of the attributes are included in default read permissions for all users, but are included here for clarity and to avoid future regression errors, should the default policy change.
Permissions are found in the "IPA Server" -> "Role-Based Access Control" -> "Permissions", where you add a new permission:
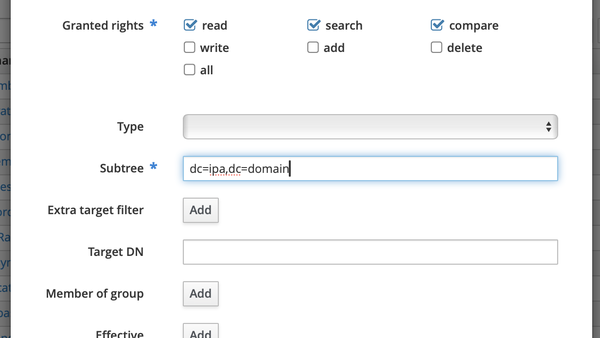
Next, create a Privilege (found just above permissions in the menu) containing only the recently created permission. Finally, create a Role containing the Privilege you just created (same menu).
Setting up a service account for DSM
Now that we have a role with permission to read the authentication data, it is time to create a service account that can be used by DSM to read the authentication data. Three steps are necessary:
- Create a host in FreeIPA for the NAS.
- Create a service account in for DSM, eg dsm/nas.ipa.domain@IPA.DOMAIN
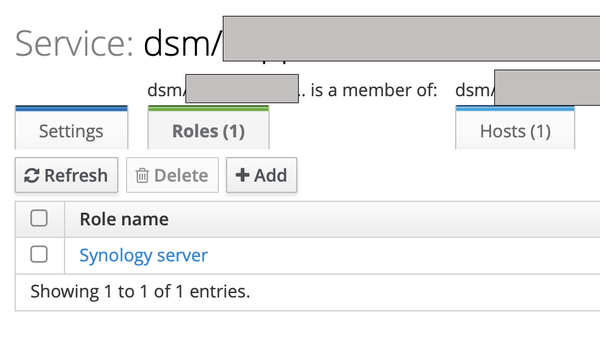
- Add the recently created role to the service.
- Enable password authentication for the service.
Adding the role is done from the service view in the FreeIPA admin interface:
Enabling password authentication has to be done using ldapmodify at the command line. In essence, a simpleSecurity objectclass is added to the service object in the LDAP directory. Then a password can be set. This can be done with a single LDIF file supplied to ldapmodify:
dn: krbprincipalname=dsm/nas.ipa.domain@IPA.DOMAIN,cn=services,cn=accounts,dc=ipa,dc=domain
changetype: modify
add: objectClass
objectClass: simpleSecurityObject
-
add: userPassword
userPassword: MyVerySecretPassord
Binding DSM to FreeIPA
The actual binding of DSM to a (from the DSM perspective) well-behaved LDAP server is simple. In the "Control Panel" of DSM, enter the Domain/LDAP section. Click "Join", where the joining dialog will be shown:
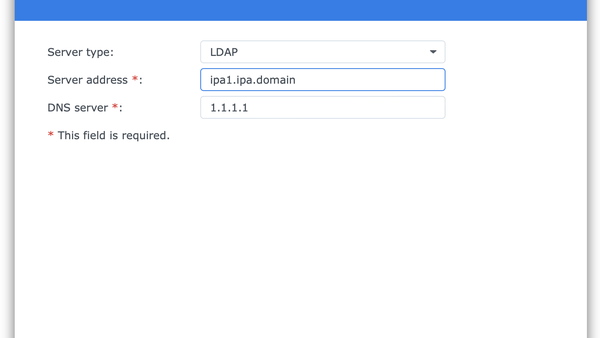
Once the server address is entered, use the service DN as binding principal, and your very secret password as password. (Yes, it is a really sensitive password. Delete the LDIF file above once you are done.)
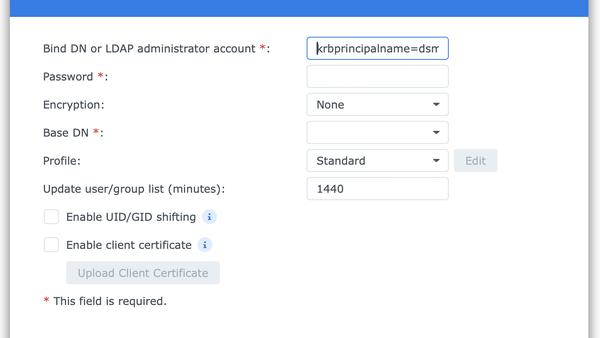
When you click 'Next', DSM will validate the LDAP server and bind to it. Now you should be able to connect to your NAS using accounts in FreeIPA. Users might have to reset their password in order for FreeIPA to generate the NT Hash.
Please contact me if there are any questions/comments.
Good luck!
Copyright © 2024 Mikael Durling. Published May 21, 2024, updated June 26, 2024.